
Red velvet brownies are a delightful dessert that brings together the best of both worlds: the rich, fudgy texture of brownies combined with the subtle cocoa flavor and striking color of red velvet cake. This recipe is perfect for special occasions, family gatherings, or even just a sweet treat at home. With simple ingredients and easy-to-follow instructions, you’ll find these red velvet brownies irresistible.
Why You’ll Love This Red Velvet Brownies Recipe
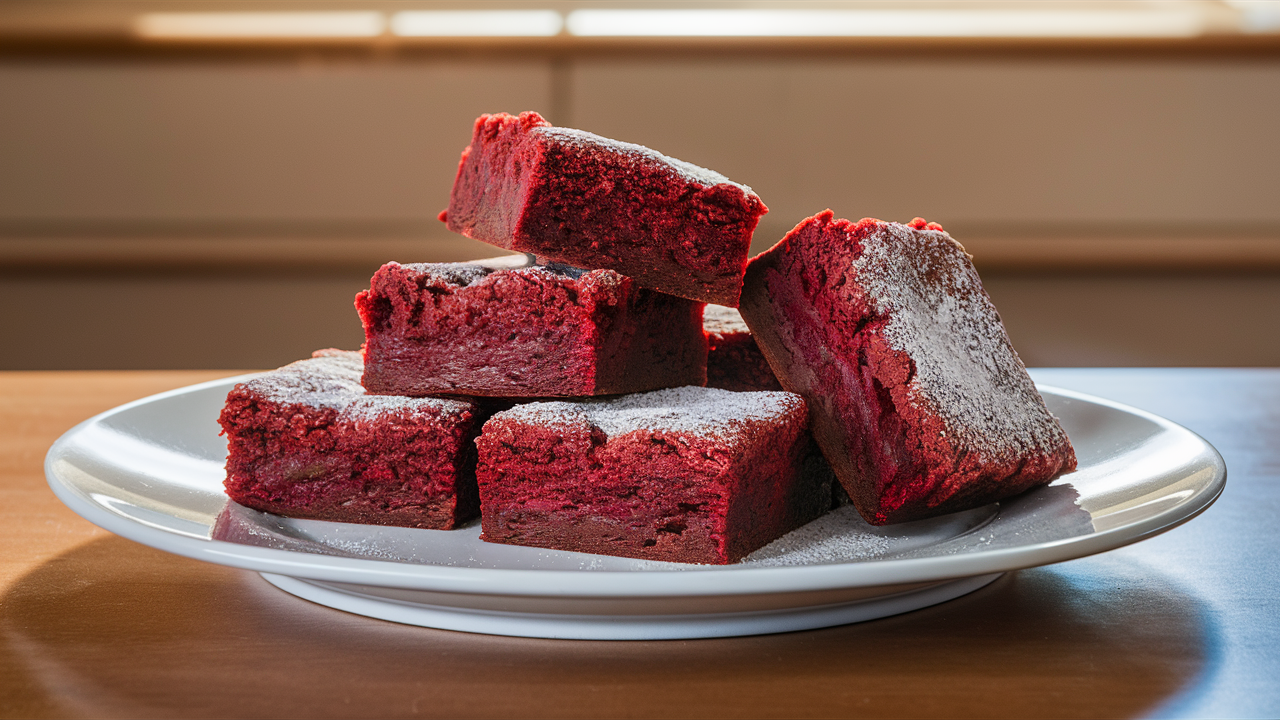
Visually Stunning and Delicious
These brownies aren’t just delicious—they’re also beautiful. The deep red color, contrasted by the creamy texture, makes them stand out on any dessert table. Whether you’re serving them at a party or enjoying them as an after-dinner treat, these red velvet brownies are sure to impress.
Perfect for Any Celebration
Red velvet brownies add a festive touch to any event. Their vibrant red color makes them ideal for holidays like Valentine’s Day and Christmas, but they’re also a hit at birthdays, potlucks, and casual get-togethers. Plus, they’re easy to make, so you can whip them up anytime you need a quick dessert.
Ingredients You’ll Need
Essential Components for Red Velvet Brownies
Here’s what you’ll need to make these delicious brownies:
- Unsalted butter (1 cup): Provides the rich, buttery base that makes these brownies so moist.
- Granulated sugar (1 ½ cups): Adds the right amount of sweetness and helps create that perfect brownie texture.
- Eggs (3 large): Binds the ingredients together, adding structure and a slightly cakey texture.
- Vanilla extract (1 teaspoon): Enhances the overall flavor, giving the brownies a warm, comforting taste.
- All-purpose flour (1 ¼ cups): The foundation of your brownies, providing the necessary structure.
- Unsweetened cocoa powder (2 tablespoons): Adds depth to the flavor with a hint of chocolate.
- Red food coloring (2 tablespoons): The key to achieving that signature red velvet color.
- Salt (¼ teaspoon): Balances the sweetness and enhances the flavors.
Substitutions and Add-ins
If you need to make adjustments based on dietary preferences or what you have on hand, here are some options:
- Gluten-free: Substitute all-purpose flour with a gluten-free flour blend.
- Dairy-free: Use coconut oil instead of butter for a dairy-free version.
- Extra indulgence: Add chocolate chips, white chocolate chunks, or swirl in cream cheese for a richer treat.
Optional Add-ins:
- Nuts: Add chopped pecans or walnuts for a crunchy texture.
- Cream Cheese Swirl: Create a marbled effect with a cream cheese mixture for added tanginess.
Tools You’ll Need for Baking
Essential Kitchen Tools
Before you start, gather these essential tools to make your baking process smooth:
- Mixing bowls: For combining the wet and dry ingredients.
- Whisk and spatula: To mix the batter evenly and smoothly.
- 9×9-inch baking pan: Perfect for ensuring even baking and the right brownie thickness.
- Parchment paper: Helps prevent sticking and makes removing the brownies from the pan easier.
- Measuring cups and spoons: For accurate ingredient measurements, ensuring consistency in your brownies.
Optional Tools for Enhancing the Baking Process
- Electric mixer: For quicker and easier mixing, especially when combining wet ingredients.
- Sifter: For sifting dry ingredients like flour and cocoa powder, ensuring a smoother batter.
- Offset spatula: Helps spread the batter evenly in the pan for consistent baking.
Step-by-Step Instructions
Preheat Your Oven
Begin by preheating your oven to 350°F (175°C). Line a 9×9-inch baking pan with parchment paper, leaving an overhang on the sides. This will make it easier to lift the brownies out of the pan once they’re baked.
Prepare the Brownie Batter
In a large mixing bowl, melt the unsalted butter. Once the butter is fully melted and slightly cooled, whisk in the granulated sugar until the mixture is smooth and fully combined. Next, add the eggs one at a time, beating well after each addition. Stir in the vanilla extract to enhance the flavor of your brownies.
Mix the Dry Ingredients
In a separate bowl, sift together the all-purpose flour, unsweetened cocoa powder, and salt. Sifting helps to remove any lumps and ensures that the ingredients are evenly distributed. Gradually add the dry ingredients to the wet mixture, stirring until just combined. Be careful not to overmix, as this can lead to dense brownies.
Add the Signature Red Velvet Color
Now it’s time to add the food coloring. Pour in the red food coloring and mix until the batter reaches your desired shade of red. If you prefer a deeper red, you can add a bit more coloring. Be sure to mix thoroughly so the color is evenly distributed throughout the batter.
Pour and Smooth the Batter
Once your batter is ready, pour it into the prepared baking pan. Use a spatula to spread the batter evenly across the pan, ensuring the top is smooth for even baking. This will help your brownies bake uniformly, avoiding any overcooked or undercooked sections.
Bake to Perfection
Place the pan in the preheated oven and bake for 25-30 minutes. The exact baking time may vary depending on your oven, so start checking for doneness at the 25-minute mark. To test if the brownies are done, insert a toothpick into the center. It should come out with a few moist crumbs attached, indicating that the brownies are baked but still fudgy.
Cool the Brownies Before Slicing
Once the brownies are done, remove them from the oven and let them cool in the pan for about 15 minutes. After they’ve cooled slightly, use the parchment paper overhang to lift the brownies out of the pan and transfer them to a wire rack to cool completely. Cooling the brownies fully before slicing will give you cleaner cuts and prevent them from crumbling.
Tips for Success Red Velvet Brownies Recipe
Achieving the Perfect Red Velvet Color
For the best red velvet color, opt for gel food coloring instead of liquid. Gel coloring is more concentrated, allowing you to use less while still achieving a vibrant hue. This also prevents the batter from becoming too watery.
Getting the Right Texture
To ensure your brownies have that perfect fudgy texture, be careful not to overmix the batter. Once the dry ingredients are incorporated, stop stirring. Overmixing can lead to a tough, dense texture instead of the desired fudgy consistency.
Common Baking Mistakes to Avoid
- Measuring Flour Correctly: Too much flour can result in dry brownies. To avoid this, spoon the flour into your measuring cup and level it off with a knife, rather than scooping directly from the bag.
- Checking for Doneness: The toothpick test is key. If the toothpick comes out clean, your brownies may be overbaked. Aim for a toothpick with a few moist crumbs to ensure fudgy brownies.
How to Store and Preserve Your Red Velvet Brownies
Storing Brownies at Room Temperature
Once your brownies are fully cooled, store them in an airtight container at room temperature. They’ll stay fresh and chewy for up to 3 days. If you live in a warmer climate, you might want to refrigerate them to prevent the butter from melting and making the brownies too soft.
Freezing Brownies for Later
For longer storage, you can freeze your brownies. Here’s how:
- Wrap each brownie individually in plastic wrap. This prevents freezer burn and keeps them fresh.
- Place the wrapped brownies in a freezer-safe bag or container.
- Label the container with the date so you know when they were made.
Frozen brownies can be stored for up to 3 months. When you’re ready to enjoy them, let the brownies thaw at room temperature, or microwave them for a few seconds for a quick, warm treat.

Serving Suggestions
Elevate Your Brownies
While these brownies are delicious on their own, there are a few ways to take them to the next level:
- Serve with Ice Cream: Pair warm brownies with a scoop of vanilla or chocolate ice cream for a decadent dessert.
- Drizzle with Chocolate Sauce: Add an extra layer of richness by drizzling melted chocolate or caramel sauce over the brownies.
- Top with Cream Cheese Frosting: Spread a thick layer of cream cheese frosting on top of the cooled brownies for a classic red velvet pairing.
Creating a Dessert Spread
If you’re serving these brownies at a party or gathering, consider creating a dessert spread with various toppings. Offer whipped cream, chocolate chips, and fresh berries so guests can customize their brownies.
Recipe Variations
Red Velvet Cheesecake Brownies
For a tangy twist, create red velvet cheesecake brownies by swirling a cream cheese mixture into the brownie batter before baking. The cream cheese adds a delicious contrast to the rich red velvet flavor.
Cream Cheese Swirl Ingredients:
- 8 oz cream cheese, softened
- ¼ cup granulated sugar
- 1 egg yolk
- ½ teaspoon vanilla extract
To make this variation, dollop spoonfuls of the cream cheese mixture on top of the brownie batter. Use a knife to swirl the cream cheese into the batter, creating a marbled effect. Bake as